The Tractor is Running
The parts for the tractor arrived just days after we ordered them. Sunday, my son and I pulled off all of the pretty sheet metal and then "had fun" replacing the water pump. First, we removed the hoses. Our first problem, there was no room to get a wrench to the front of the fan to remove it from the nose of the old water pump. We removed the rear cowling from the radiator, but that did not help. We removed the air filter to get access to the bolts which held the radiator to its frame. We loosened the radiator in its frame to lift it out, but that did not work either. The lower radiator hose fitting would not pass the fan blade and, of course, the old water pump would not turn. We ended up removing the radiator frame. This exposed the front of the fan.
Before we went any further, we stopped and scraped off all of the accumulated dirt, grease and other gunk. Some of it we already had to remove, just to find the bolt-heads in order to disassemble to the point where we were.
The next steps were straight forward. Loosen the alternator to release the fan belt tension. Remove the fan from the water pump and, lastly, remove the old water pump. We took about three hours to accomplish the first half of a one-hour job!
Now, it was time to put it back together. We started by mounting the new hose which connects the engine block to water pump, then mounting the water pump. Next, we attached the radiator by-pass hose from the water pump to the thermostat. We bolted the fan blade to the nose of the water pump. We hung the fan cowling on the fan blade. The radiator frame went on next, followed by the radiator. We bolted the cowling to the radiator frame. After we connected the new upper and lower radiator hoses, we filled the cooling system again. Lastly, we mounted the air filter. The engine was ready to test. This section of the job took us about a half hour.
The tractor started without any problems. We let it run for a few minutes and did not see any leaks. The pretty sheet metal is still not mounted. It needs to be cleaned and painted and we do not need it mounted to use the tractor.
We still have a few problems:
- The structural elements in the nose of the tractor need to be cleaned and painted. This includes the radiator frame, the cowling and the fan blade. To do this, we will have to disassemble the cooling system again.
- The hydraulic hoses to the rear of the tractor are old and one of them leaks. Fortunately, those hoses are not required to run the three-point hitch.
- All of the gauges on the dash board need to be replaced.
- All of the wiring, including the battery, starter and starting circuit wiring, is old and needs to be replaced. It will work for now, but its life is very limited.
- The pretty sheet metal needs to be cleaned and painted, both inside and outside. Not only will this make the tractor look better, but it will also protect it from the weather.
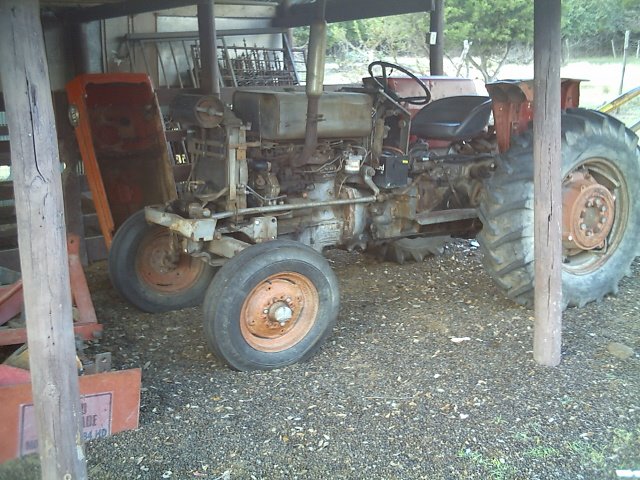
She may not be pretty, but she's still a workhorse!
Using the tractor, we are having some problems with the three-point hitch. Without warning, it sometimes lifts the plow blades. This causes us to stop and back up the tractor, drop the blades and try again. I suspect we may need to rebuild the hydraulic system. Again, age is the major factor.
The plowing is now done! The next chore is to level the garden and get the seeds planted. Once the seeds are in, we will get the fence up to keep the herd out of the garden.
posted by Jalapeno Bob at 1:45 AM
![]()


0 Comments:
Post a Comment
<< Home